The current page is limited to the one-time installation and configuration of the separate components of the webserver. By the end of this page, you will have a basic webserver setup, ready to start deploying individual websites. To get the individual websites actually running you need to return to the main page and complete the setup of a website.
Basic setup of my LEMP-P server
- Get yourself a droplet at DigitalOcean
- Create a user with adminstrative rights
- Install the packages
- Enable and configure the firewall
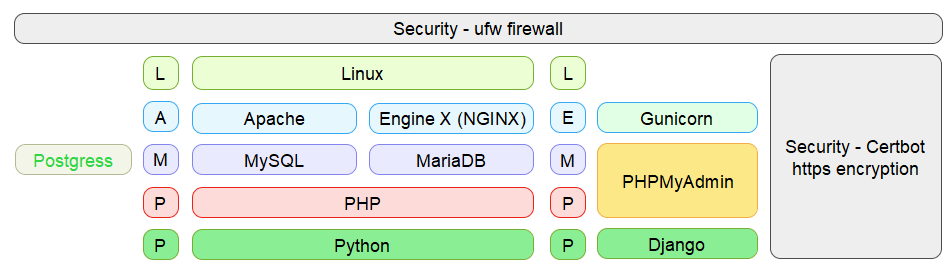
Basic LAMP-P (Apache) or LEMP-P (NGINX) setup. On these pages, I prefer MySQL over Postgress or MariaDB
1. Get yourself a droplet at Digital Ocean
At $60 per year ($72 backup included) this is a reasonably priced provider of serverspace that is fully in your own control. It takes some effort to have the relevant software properly installed, but there are no limitations as to how you want to use your server. With 8 datacentres around the world, chances are good there will be a DigitalOcean server just around your corner, which can help with speed and privacy issues. To get started simply create a droplet with the latest LTS of Ubuntu and you will get 1GB of working memory, 25GB of diskspace and a unique ip-address for your server.
2. Create a user with adminstrative rights
DigitalOcean provides initital server setup instructions (tutorial), which includes adding a superuser and setting up the firewall. As a Windows convict, I prefer SmarTTY as my SSH client to connect to the server. SmarTTy is very similar to classic PuTTy, but has some added features, that takes the pain out of surfing the Linux directory structure, that can sometimes be daunting. As there is only a root user to begin with, the initial connection will need to be with root@ip-adress, using the password that you created when setting up the droplet. Alternatively, you could use an SSH-key for easier connection, but SmarTTy will fix this automatically (see: secure your webserver).
# adduser newuser
# usermod -aG sudo newuser
After creating the newuser with adminstrative rights, it is preferable to have all further SSH-connect with newuser@ip-address and to run admin-commands with the prefix sudo.
3. Install the packages
For the LEMP-stack (tutorial) you will need NGINX (tutorial), MySQL-server (tutorial) and PHP.
NGINX
$ sudo apt update
$ sudo apt install nginx
To avoid a hash bucket memory problem when adding websites, you need to adjust the server_names_hash_bucket_size directive in the /etc/nginx/nginx.conf file. Open the file, locate the directive and remove the # symbol to uncomment the line.
http {
    ...
    server_names_hash_bucket_size 64;
    ...
}
MySQL-server and php
$ sudo apt install mysql-server
$ sudo apt install php-fpm php-mysql
$ sudo mysql_secure_installation
After the last command you need to make some minor decision about security checks. Details are provided in step 2 of the tutorial. I do not like the strict checking of passwords, since I allow no one but myself to create databases.
Additionally, it might be a good idea to adjust user authentication and privileges to use a password for root. For some secure settings this might perhaps be undesirable, but on the other hand, this may avoid complications when you need to allow an external program (e.g., phpMyAdmin) to access the user (step 3 of the tutorial).
phpMyAdmin and Certbot packages
As additional tools, I use phpMyAdmin (tutorial) and Certbot (tutorial). As I do not intent to learn all the intricacies of SQL, I consider phpMyAdmin as indispensable to deal with my databases. Certbot is an easy-to-use automatic client that provides free certicates to secure http with ssl/tls encryption (https).
$ sudo apt install phpmyadmin
$ sudo phpenmod mcrypt
$ sudo systemctl restart php7.2-fpm
$ sudo add-apt-repository ppa:certbot/certbot
$ sudo apt install python-certbot-nginx
Make sure not to select a server when installing phpMyAdmin, as NGINX is not provided as a choice. Just TAB to ENTER and proceed without a choice (see step 1 of the tutorial).
After installing everything according to instruction, I came accross an annoying compatibility issue between the current version in the repository of phpMyAdmin (v4.6.6) and PHP (7.2). There is a newer version of phpMyAdmin on the official website (v4.8 as of writing), which fixes these issues. A partial workaround, that works reasonably well, is provided on DevAnswers.co.
WordPress
If you want to use WordPress (tutorial), you will require some additional php-extensions. Each WordPress plugin has its own set of requirements. Check the plugin documentation to see the PHP requirements. Additional extensions may need to be installed with apt as demonstrated here.
I install the wordpress-files in /var/www/ as an arbitrary choice. The files can be placed in any writable directory. I will use the directory later as a repository when configuring a WordPress website.
$ sudo apt install php-curl php-gd php-intl php-mbstring php-soap php-xml php-xmlrpc php-zip
$ sudo systemctl restart php7.2-fpm
$ cd /var/www
$ sudo curl -LO https://wordpress.org/latest.tar.gz
$ sudo tar xzvf latest.tar.gz
$ sudo rm latest.tar.gz
$ sudo cp /var/www/wordpress/wp-config-sample.php /var/www/wordpress/wp-config.php
Python-Django packages
Finally, to use Python-Django (tutorial) with MySQL-support, you need to install some more packages. I include Git as a helpfull tool to exchange files between the local development and the server production environment for a Django-website.
$ sudo apt install python3-pip
$ sudo apt install python3-venv
$ sudo apt install python3-dev
$ sudo apt install libmysqlclient-dev
$ sudo apt install git
4. Enable and configure the firewall
With all the packages installed, the initial setup (tutorial) is completed with a firewall enabled and configured. the command sudo ufw allow OpenSSH will allow ssh-connection and sudo ufw allow ‘Nginx Full’ will open the ports 80 and 443, to allow both normal and encrypted web traffic.
$ sudo ufw enable
$ sudo ufw app list
$ sudo ufw allow OpenSSH
$ sudo ufw allow 'Nginx Full'
$ sudo ufw status
$ sudo ufw status verbose
Set the firewall as precise and strict as needed for use of the server. For basic use, the webserver probably will need ports 80 and 443 to be open (Nginx Full). For SSH, you will either use 22/tcp (OpenSSH) or specify your own choice (see: secure your webserver, tutorial). If needed you can remove rules by number or by name.
$ sudo ufw status numbered
$ sudo ufw delete 2
$ sudo ufw delete allow OpenSSH